Cognitive Robotics - Software Installation Guide
Contents
This page provides a step-by-step guide to installing the tools, utilities, and example software for Cognitive Robotics using Ubuntu 18.04, ROS Melodic, and the CRAM cognitive architecture.
Please follow these instructions exactly as they are stated.
Do not be tempted to skip through them, assuming that you will be able to figure it out yourself. You might, but it is more likely you will miss something small but important and it won't work as required. Take your time, follow these instructions carefully, and everything will work.
In the past, there were two options:
- Option A: install the VirtualBox Ubuntu 18.04 virtual machine (VM) with everything pre-installed.
- Option B: install all the required tools and utilities directly on a computer running Ubuntu 18.04.
However, the recommended setup for CRAM is now Ubuntu 20.04 with ROS Noetic and, unfortunately, the material in this course no longer works correctly with this configuration.
The CRAM installation page still has instructions for installing with Ubuntu 18.04 with ROS Melodic but it is unclear how long this will be supported. Apparently, support for the Lisp version of CRAM, which is what this course uses, has been discontinued.
For that reason, we restrict ourselves here to Option A.
Option A: Install the VirtualBox Ubuntu 18.04 Virtual Machine
Install VirtualBox
There follows instructions for Windows, Mac OS, and Ubuntu (in case you already have Ubuntu but want to use the VM instead of installing all the required tools and utilities).
Windows
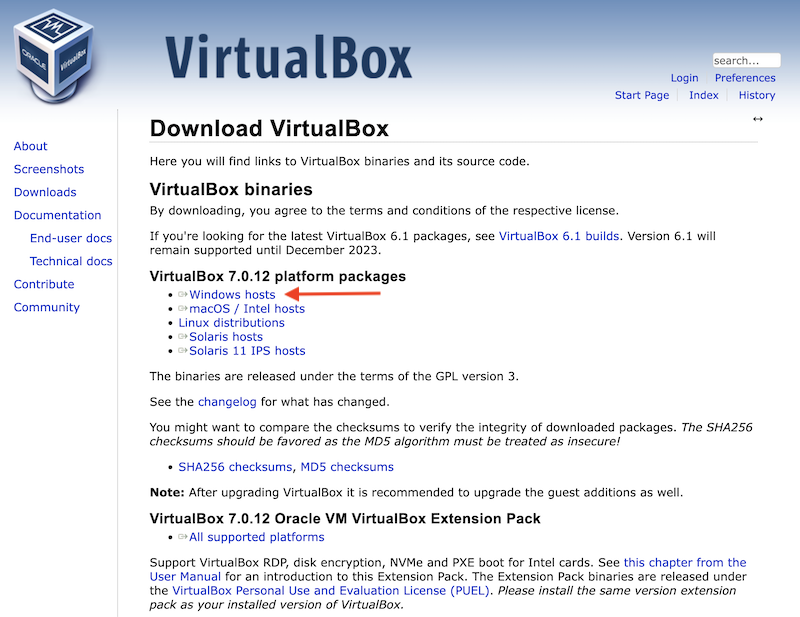
Open the VirtualBox Download page at https://www.virtualbox.org/wiki/Downloads and select Windows hosts to download the installation file.
Double click on the downloaded file (VirtualBox-7.0.18-162988-Win.exe at time of writing) and follow the instructions.
MacOS
Download the .dmg installer for OS X systems, execute the file and follow the instructions.
If the VirtualBox installer fails as it is completing the installation, it is probably a problem with a security setting. Go to System Preferences > Security & Privacy. Click the lock to make changes (if necessary). Click the Allow button at the bottom and re-run the installer.
Ubuntu Linux
You can install VirtualBox via the Ubuntu Software Center or through command line as follows.
 sudo apt update
 sudo apt install virtualbox
Install the VirtualBox Extension Pack
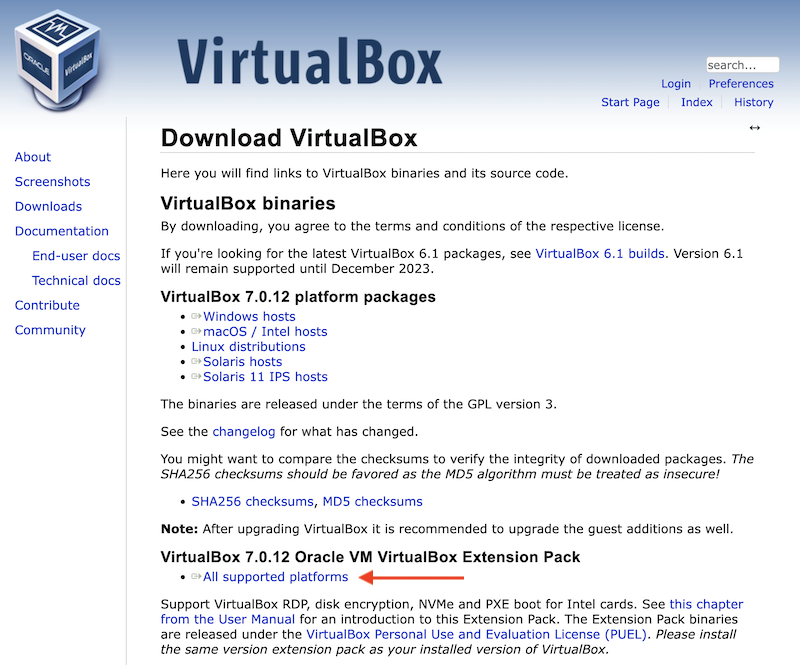
Select All supported platforms on the VirtualBox Download page to download the VirtualBox Extension Pack. This is needed to provide access to USB devices such as the Lynxmotion AL5D robot manipulator, iRobot Create 2 mobile robot, and webcams.
Double click on the downloaded file (Oracle_VM_VirtualBox_Extension_Pack-7.0.18.vbox-extpack at time of writing) and follow the instructions.
VirtualBox Setup
Step 1: Copy the Virtual Disk Image
The virtual disk image cram-vm.vdi contains a VirtualBox virtual machine with Ubuntu 18.04, ROS Melodic, and example code pre-installed. You can access a zipped version of it here. Download it, unzip it, and copy it to some convenient, easily-identified folder. It is 15 GB and unzips to 27 GB.
Step 2: Launch VirtualBox
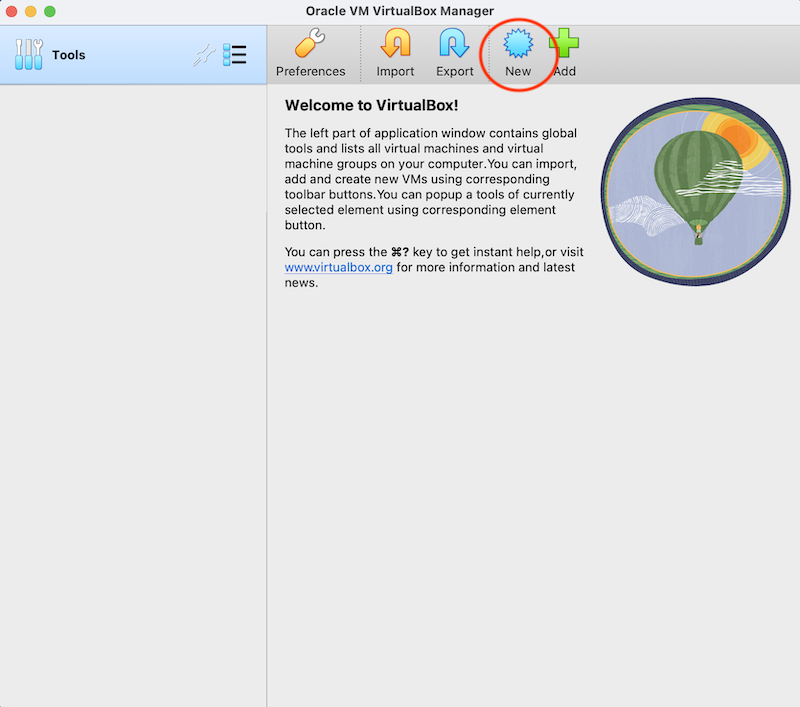
In VirtualBox, you first need to create a new virtual machine. Click on the New button.
If a window with the guided menu open, change to expert mode.
Step 3: Create and configure the virtual machine
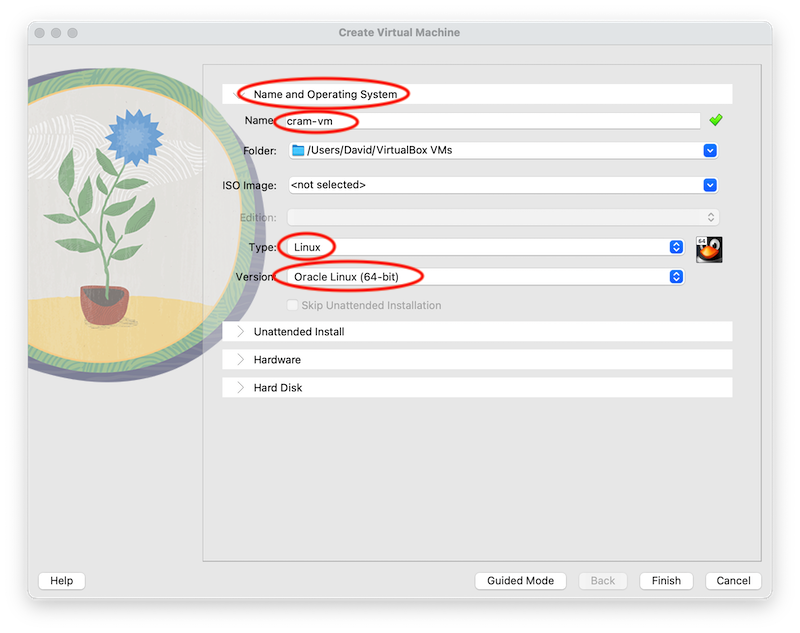
If it's not already open, click the Name and Operating System tab
- Set the name to cram-vm
- Select Linux for the operating system type
- Select Ubuntu (64-bit) for the operating system version
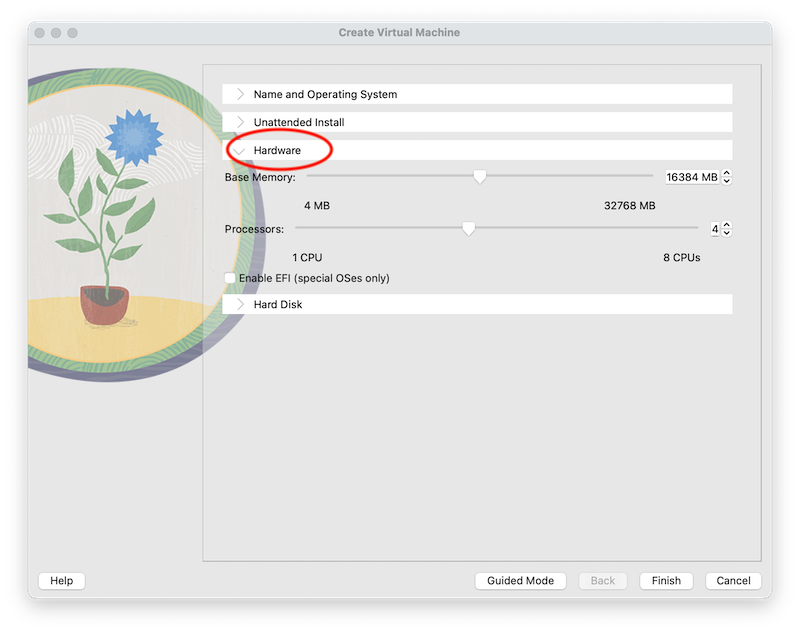
Click the Hardware tab.
- Set the VM's memory size (RAM); choose 4096 MB or more if your PC's capacity allows. We set it to 16384 MB in the screenshot
- Set the number of processors to use. We set it to 4 in the screenshot.
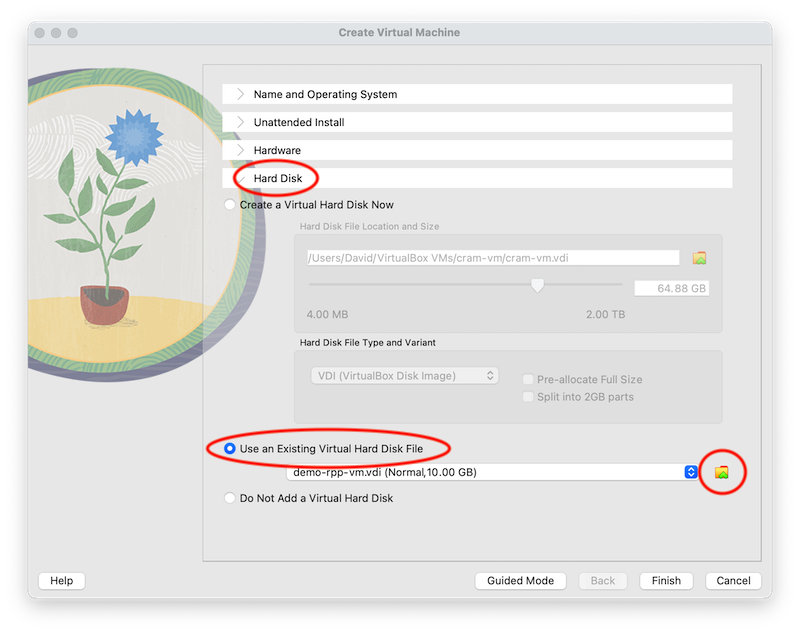
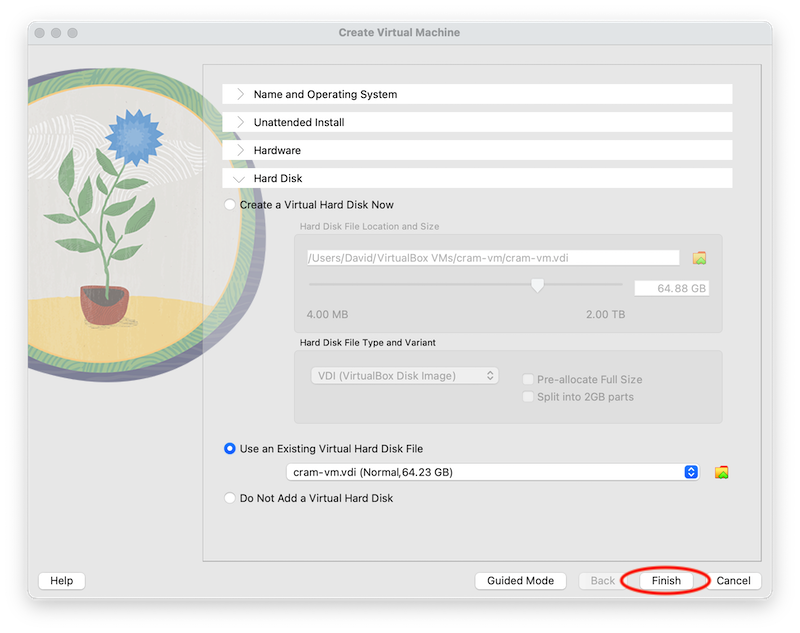
Click the Hard Disk Tab
- Select Use an Existing Virtual Hard Disk File
- Using the button on the right, open the file explorer
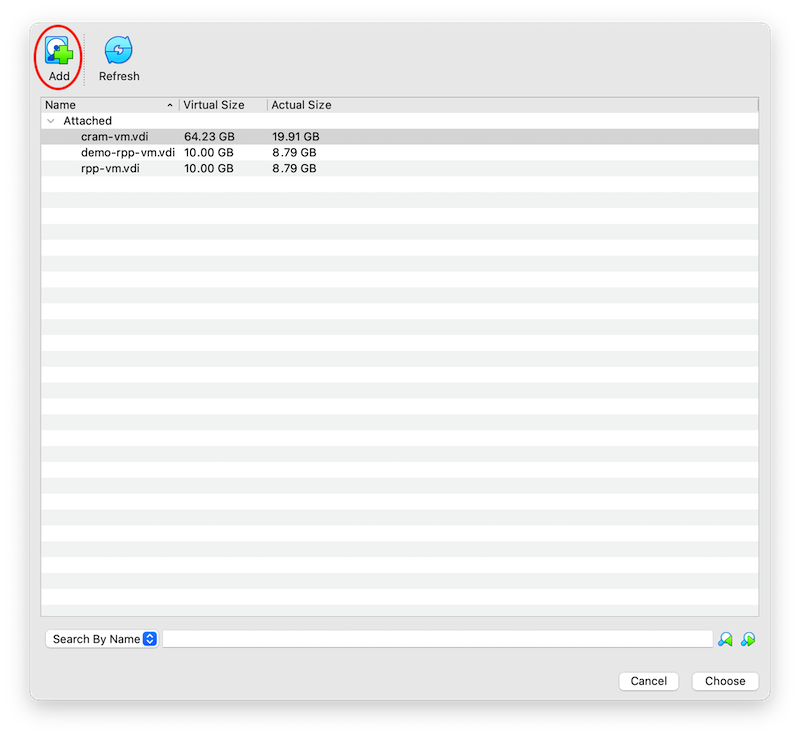
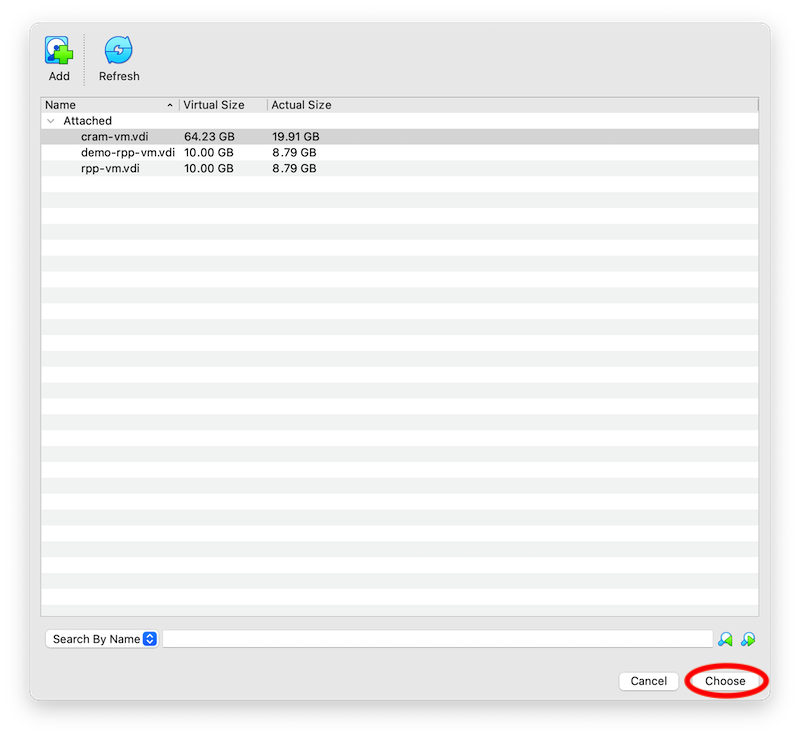
In the window that pops up, click Add
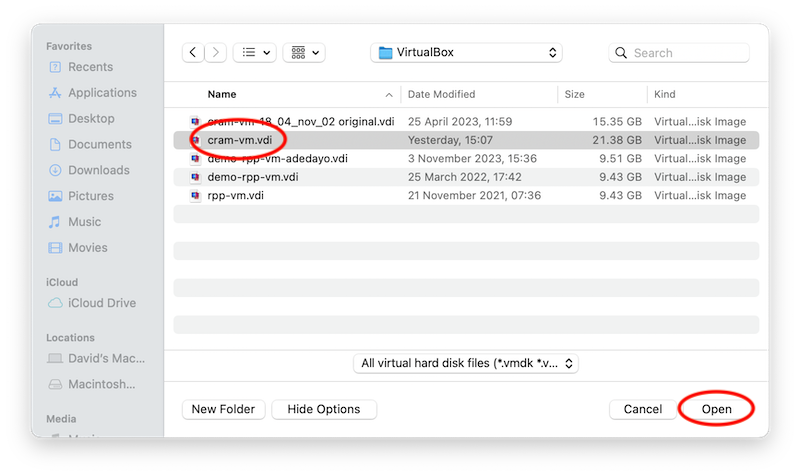
Browse to where you stored the cram-vm.vdi file, select it, and click Open
Click Choose
Finally, click Finish
Step 4: Enable USB devices
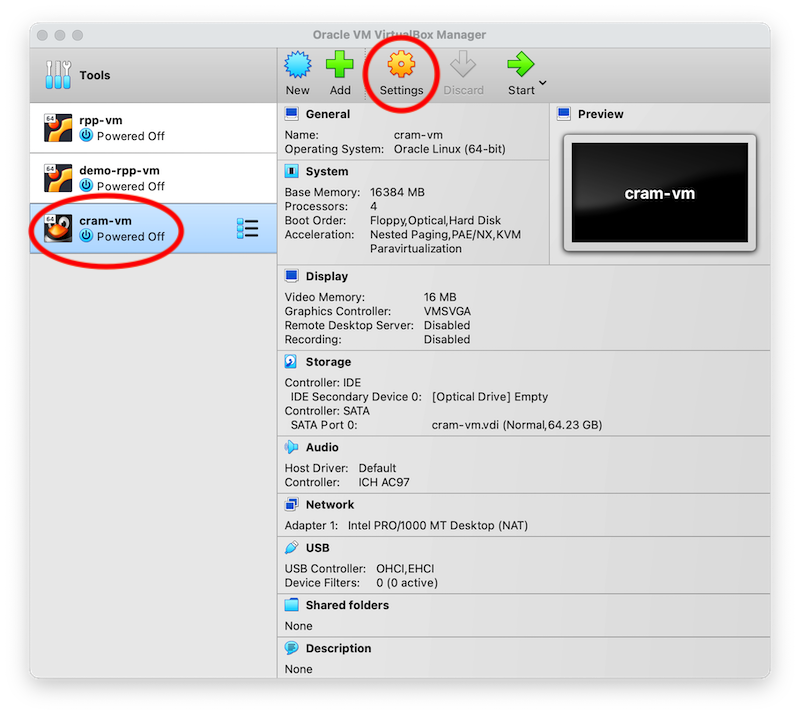
Choose the newly created virtual machine and click on Settings.
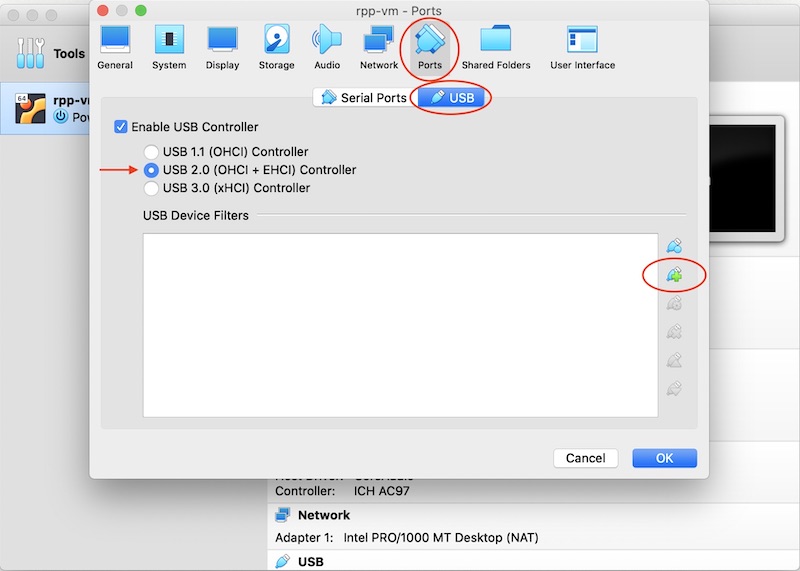
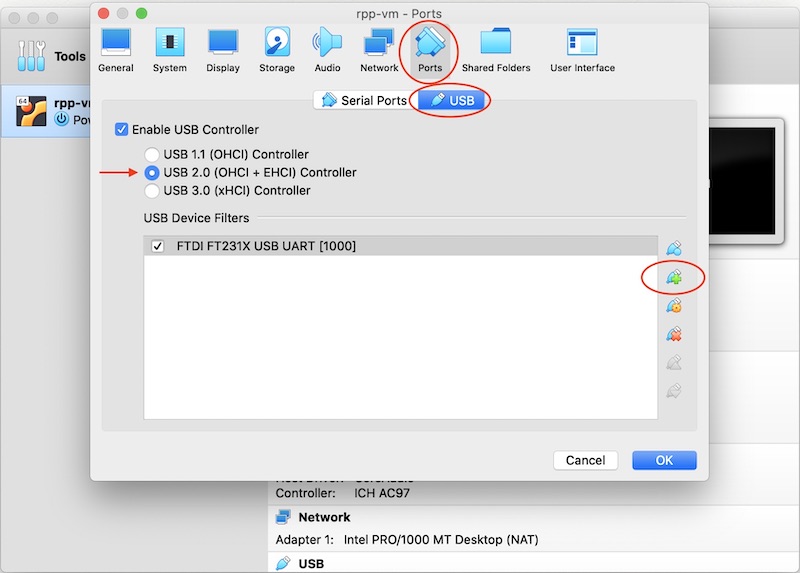
- Click on Ports.
- Click on USB and select USB 2.0.
- Choose the device you want to add from the list by clicking the connector icon with the green cross at the right hand side.
Notice that none of the devices you want to add, e.g., Lynxmotion AL5D robot manipulator, are in the list.
This is because the device needs to be connected before it can be added.
Here is what you would see if the iRobot Create 2 mobile robot was connected.
For now, just add your webcam and remember to return to this step when you want to use any USB device later in the course, e.g., an external webcam, the Lynxmotion AL5D robot manipulator, or the iRobot Create 2 mobile robot.
The device for the Lynxmotion AL5D robot manipulator is FTDI FT232R USB UART [0600].
The device for the iRobot Create 2 mobile robot is FTDI FT231X USB UART [1000].
Note: if your host operating system is Ubuntu, you should also enter the following in a terminal of your host machine and then restart the cram-vm virtual machine:
$ sudo adduser $USER vboxsf
Step 5: Enable Host OS to Guest OS Copy and Paste
When doing exercises and assignments, you may wish to copy text from the host OS (Windows 11, probably) and paste it to the guest OS (Ubuntu 18.04). Note that pasting to the terminal is <shift> <ctrl> v not <ctrl> v.
To do this, we need to enable Shared Clipboard and Drag’n’Drop functionality between Guest and Host Machine.
To enable Host OS to Guest OS Copy and Paste, Guest Additions must be installed in the virtual machine. This has already been done in the cram-vm virtual machine.
Power off your Ubuntu guest OS.
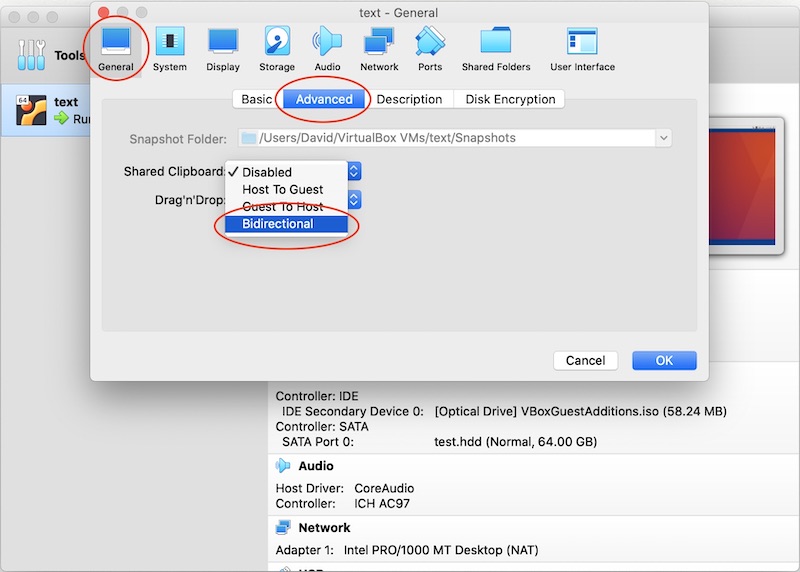
Choose the cram-vm virtual machine and click on Settings.
Click on General and Advanced and select Shared Clipboard and choose the Bidirectional option.
Select Shared Drag 'n' Drop and choose the Bidirectional option.
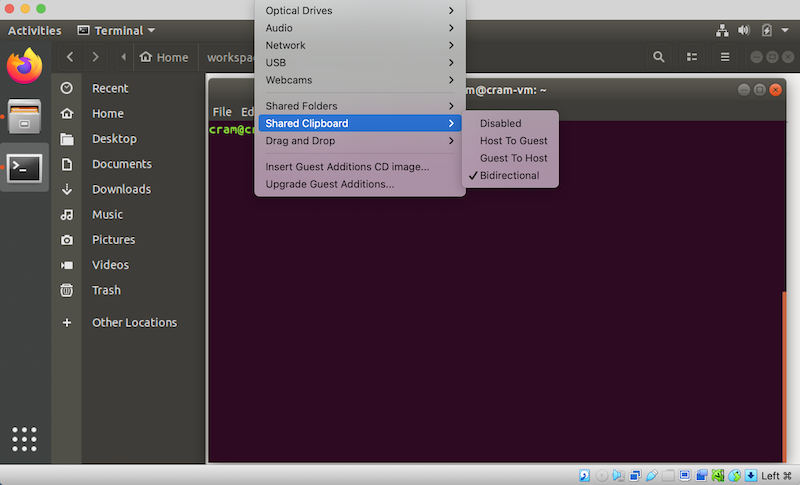
When you restart the virtual machine, double check that the copy and paste, and the drag and drop functionalities are enabled.
Click on Devices and Shared Clipboard and choose the Bidirectional option.
Now, click on Devices and Drag and Drop and choose the Bidirectional option.
Everything is set up and the virtual machine can now be started. When Ubuntu 18.04 boots, enter the password cram, if asked.
Accessing Physical Devices
For completeness, here are the instructions to access the Lynxmotion AL5D robot manipulator. Instructions for a USB camera will be added later. You can carry out these instructions when you have access to the robots and cameras in the lab.
If you are using the cram-vm VM, don't forget to enable access to the USB ports; see Step 4 of VirtualBox Setup in Option A above.
Setup the Connection to the Lynxmotion AL5D Robot Manipulator
1. Switch on the robot.
2. Connect your laptop to the robot controller using the USB cable.
3. If you are using the cram-vm VM, add the robot controller USB device to the list of registered USB devices by following the instructions in Step 5: Enable USB Devices of VirtualBox Setup in Option A above.
4. Check that everything is working, as follows.
- Open a new terminal and run the following command. Joint 0, i.e. the joint at the base of the robot, should rotate to the centre position.
echo "#0P1610S250" > "/dev/ttyUSB0" % setpoint 1610 for joint 0 at speed 250
5.Trouble shooting: if the robot does not move, do the following (recall that the superuser password is cram).
sudo usermod -a -G dialout cram
- Power down the virtual machine (or PC if you are running Ubuntu natively) and power it back up again for the permissions to take effect.
- Check that the device is connected by inspecting the message produced by the following command or by clicking on the small blue USB connector icon at the bottom of the Ubuntu window.
dmesg | grep -i FTDI
- If are using the
cram-vmvirtual machine and your host operating system is Ubuntu, you should also enter the following in a terminal of your host machine and then restart the virtual machine:
$ sudo adduser $USER vboxsf
- Repeat Step 4.
- If the virtual machine displays blank black screen, try pressing CTRL + F on your keyboard. It should then display the content.
